State management is a critical aspect of building robust, scalable web applications. If you’re exploring the best way to manage state in Next JS 14 , you’ll find several approaches ranging from built-in options to advanced libraries. Whether you’re a beginner or an experienced developer, mastering the best way to manage state in Next JS ensures seamless performance for modern web applications.
Whether you’re building a blog, an eCommerce platform, or a full-stack application with Next.js certification, mastering state management ensures your app is efficient and responsive. Let’s dive into the essentials.
Why is state control important in Next js?
In a Next.js application, state control plays an important role in synchronizing your UI with your application data. To use third-party libraries such as React Redux, the Context API, or Zustand, choosing the right configuration solution depends on the complexity of your application.
Some cases where state control in Next js is important are:
- User authentication: Manages login status through libraries such as next-auth.
- Global data sharing: Sharing content, user profiles, or cart data between departments and pages.
- Server State Control: Managing data retrieved from APIs.
- Forms management: Synchronize form state with your backend.
Improving state management in Next js
Starting with Next.js 13, the framework introduced App Router, which changed how developers build React applications. State management has become much more flexible with the release of Next.js 14, which allows you to better interact with React’s Concurrent Features and React Server Components
Let’s explore the most popular state management solutions for Next.js 14.
The best state management library for Next.js 14

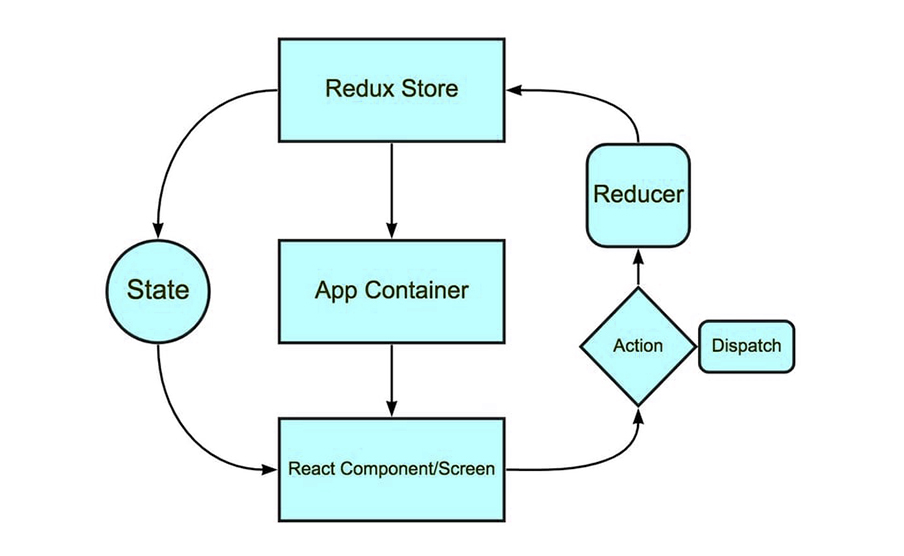
1. Redux Toolkit: The Best Way to Manage State in Next JS
When considering the best way to manage state in Next JS, Redux Toolkit is still one of the most popular options for Next.js with Redux Toolkit. It simplifies the Redux boilerplate and simplifies integration with App Router.
How to Set Up Redux Toolkit in Next.js:
1. Install dependencies:
npm install @reduxjs/toolkit react-redux2. Create a store in store.js:
import { configureStore } from '@reduxjs/toolkit';
import counterReducer from './features/counterSlice';

export const store = configureStore({
    reducer: {
        counter: counterReducer,
    },
});
3. Wrap your app in Provider:
import { store } from './store';
import { Provider } from 'react-redux';

function App({ Component, pageProps }) {
    return (
        <Provider store={store}>
            <Component {...pageProps} />
        </Provider>
    );
}

export default App;
With Redux Toolkit, you can efficiently handle app-level state while enjoying the benefits of centralized data management.

2. Zustand: Lightweight and adjustable
Zustand is a great choice for developers who like simplicity. This library is smaller than Redux and works well with the React framework including Next.js.
Highlights of the Zustand:
- Minimal boilerplate.
- Supports React Server Components.
- Great for small to medium businesses.
1. Install dependencies:
npm install zustand2. Create a store:
import { create } from 'zustand';

const useStore = create((set) => ({
    count: 0,
    increment: () => set((state) => ({ count: state.count + 1 })),
}));

export default useStore;
3. Use the store in a component:
import useStore from './store';

function Counter() {
    const { count, increment } = useStore();
    return (
        <div>
            <p>Count: {count}</p>
            <button onClick={increment}>Increment</button>
        </div>
    );
}
3. Context API: The Built-in Option
Choosing the best way to manage state in Next JS depends on the size and complexity of your app. Evaluate each option to ensure it meets the specific needs of your business.
Example:
1. Create a context:
import { createContext, useContext, useState } from 'react';

const AppContext = createContext();

export const AppProvider = ({ children }) => {
    const [user, setUser] = useState(null);
    return (
        <AppContext.Provider value={{ user, setUser }}>
            {children}
        </AppContext.Provider>
    );
};

export const useAppContext = () => useContext(AppContext);
2. Wrap your app with the provider:
import { AppProvider } from './context';

function App({ Component, pageProps }) {
    return (
        <AppProvider>
            <Component {...pageProps} />
        </AppProvider>
    );
}

export default App;
3. Wrap your app with the provider:
import { AppProvider } from './context';

function App({ Component, pageProps }) {
    return (
        <AppProvider>
            <Component {...pageProps} />
        </AppProvider>
    );
}

export default App;
4. Access the context:
import { useAppContext } from './context';

function Profile() {
    const { user } = useAppContext();
    return <div>{user ? `Welcome ${user.name}` : 'Please log in.'}</div>;
}
4. React Query: Simplifying server-state processing
React Query (or TanStack Query) is a good choice for applications that rely heavily on server data. It handles caching, deduplication, and background updates.
Integration Steps:
1. Install React Query:
npm install @tanstack/react-query2. Set up a query client:
import { QueryClient, QueryClientProvider } from '@tanstack/react-query';

const queryClient = new QueryClient();

function App({ Component, pageProps }) {
    return (
        <QueryClientProvider client={queryClient}>
            <Component {...pageProps} />
        </QueryClientProvider>
    );
}

export default App;
3. Fetch data:
import { useQuery } from '@tanstack/react-query';

function Todos() {
    const { data, error, isLoading } = useQuery(['todos'], fetchTodos);

    if (isLoading) return 'Loading...';
    if (error) return 'An error occurred';

    return (
        <ul>
            {data.map((todo) => (
                <li key={todo.id}>{todo.title}</li>
            ))}
        </ul>
    );
}
5. Recoil: Powerful but mild
Recoil is another library that is gaining traction among React framework users. It is a great fit for state managed medium to large apps.
Next js authentication and state management
Handling user sessions is a common practice in Next.js authentication. Using next-auth you can easily manage the authentication state in your app.
Steps for Next.js Authentication:
1. Install next-auth:
npm install next-auth2. Configure a provider in pages/api/auth/[…nextauth].js:
import NextAuth from 'next-auth';
import Providers from 'next-auth/providers';

export default NextAuth({
    providers: [
        Providers.GitHub({
            clientId: process.env.GITHUB_ID,
            clientSecret: process.env.GITHUB_SECRET,
        }),
    ],
});
3. Access the session state in a component::
import { useSession } from 'next-auth/react';

function Dashboard() {
    const { data: session } = useSession();

    return session ? <p>Welcome, {session.user.name}</p> : <p>Please log in.</p>;
}
Choosing the best way to manage state in Next JS for your application
Here’s a quick guide to choosing the best solution for your app:
- Simple Apps: Use Context API or Zustand.
- Complex Global State: Choose Redux Toolkit.
- Server Data Handling: Go with React Query.
- Authentication: Use next-auth.
Tips for Managing State in Next js
- Keep State Minimal: Avoid overcomplicating your state by only storing essential data.
- Leverage Server Components: With Next.js 14’s App Router, manage data fetching at the component level.
- Combine Solutions: Don’t hesitate to use multiple libraries for different use cases.
Final Thoughts
The state management in Next JS 14 gives no headaches if implemented correctly because there are modern strategies available for that. It does not matter whether you are creating elementary apps or deep-rooted projects. An understanding of how to manage state in Next.js enables a smooth workflow and development cycle. Using contemporary toolkits such as Redux Toolkit, Zustand, or React Query helps in building big, effective, and easy to support applications.
What are you waiting for? Start checking the state management vis-a-vis Next.js and experience it to the fullest. You will get to learn how to take advantage of this robust React framework.
Frequently Asked Questions – FAQ
The best way to manage the state in Next.js 14 depends on your application’s needs. Popular options include Redux Toolkit for complex state management, Zustand for lightweight applications, and React Query for server-state handling. Each provides unique advantages tailored to Next.js features like the App Router.
Next.js’s state management makes sure that the user interface of your application remains in sync with data from other components. It is essential for managing server-state updates, global data sharing, and Next.js authentication, which helps to make applications scalable and effective.
The App Router in Next.js 14 improves state management by seamlessly automating React’s Concurrent Features and Server Components. It simplifies state management across pages and objects, improving app performance.


